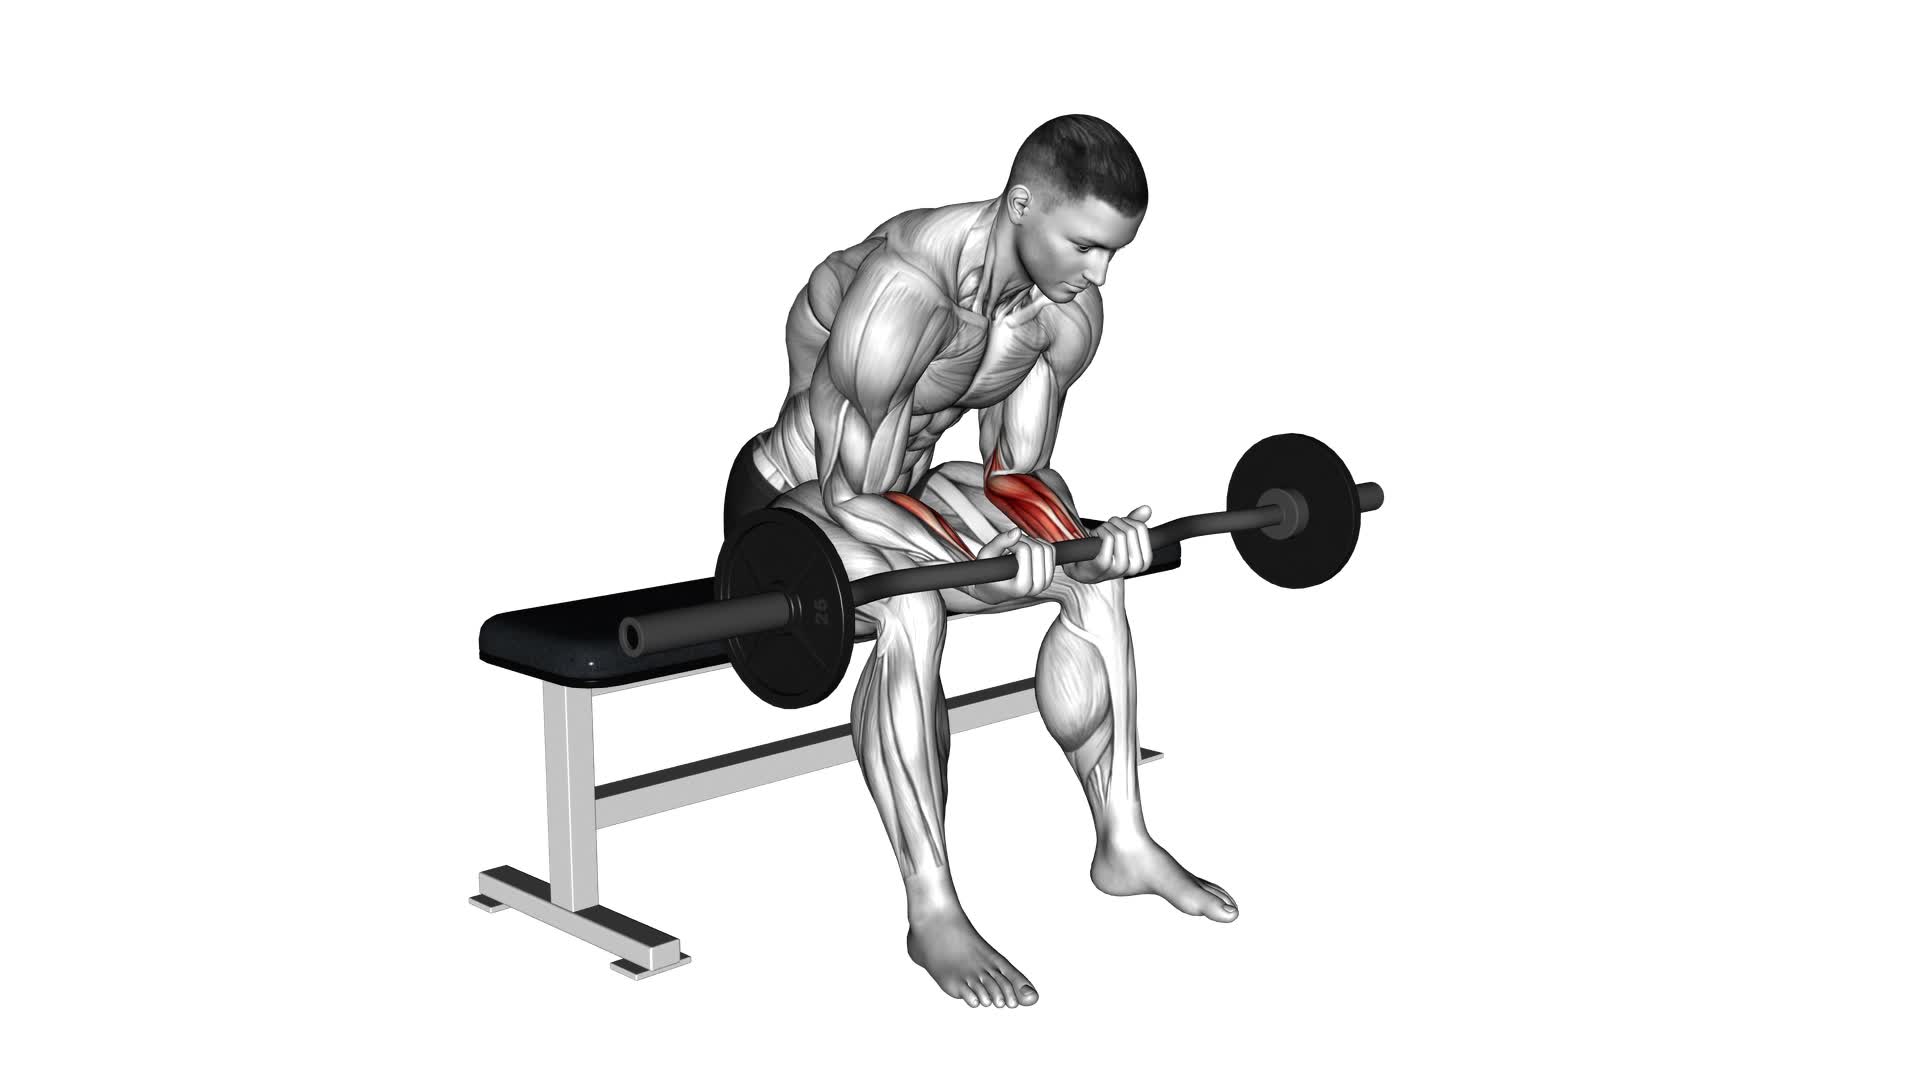
EZ Bar Seated Wrist Curl – Video Exercise Guide & Tips

If you want to strengthen your wrists and forearms, the EZ Bar Seated Wrist Curl is a great exercise to add to your routine.
Watch This Exercise Video
In this video exercise guide, we'll show you the proper form and technique, as well as common mistakes to avoid.
You'll also learn variations and progressions for advanced lifters, along with tips for maximizing your wrist and forearm strength gains.
Get ready to take your wrist curls to the next level!
Key Takeaways
- The EZ Bar Seated Wrist Curl strengthens wrists and forearms.
- Proper form and technique are important for maximizing the benefits and avoiding common mistakes.
- Hand positioning, including a shoulder-width underhand grip, is crucial for maintaining wrist alignment and flexibility.
- Elbow stability and alignment should be maintained during the exercise to prevent injury and engage the targeted muscles effectively.
Benefits of the EZ Bar Seated Wrist Curl
The EZ Bar Seated Wrist Curl is an effective exercise for building strength in your wrists and forearms. By performing this exercise, you can improve your grip strength, enhance wrist stability, and develop stronger forearm muscles.
One of the main benefits of the EZ Bar Seated Wrist Curl is the variety of variations it offers. You can adjust the weight and grip position to target different areas of your wrists and forearms. For example, using a wider grip will emphasize the inner portion of your forearms, while a narrower grip will target the outer portion. This exercise can also be performed with a straight bar or dumbbells to add variety to your routine.
Additionally, the EZ Bar Seated Wrist Curl is a simple yet effective exercise that can be done by people of all fitness levels. Whether you're a beginner or an advanced lifter, this exercise can help you increase your wrist and forearm strength. It's also a great option for those recovering from wrist injuries, as it allows for controlled movements and reduces strain on the joints.
Proper Form and Technique for the Exercise
To perform the EZ Bar Seated Wrist Curl with proper form and technique, there are a few key points to keep in mind.
First, hand positioning is crucial – make sure your hands are shoulder-width apart and that your wrists are in line with your forearms.
Secondly, focus on maintaining elbow stability and alignment throughout the movement to prevent strain or injury.
Lastly, be mindful of common mistakes such as using excessive weight or allowing your wrists to bend too far back, as these can compromise the effectiveness of the exercise and increase the risk of injury.
Hand Positioning Importance
When performing the EZ Bar Seated Wrist Curl, ensure proper form and technique by focusing on hand positioning. Hand positioning techniques play a crucial role in maximizing the benefits of this exercise and preventing injuries.
To start, grip the EZ bar with an underhand grip, placing your hands shoulder-width apart. Keep your wrists straight and aligned with your forearms throughout the movement. This position helps maintain tension in the targeted muscles, promoting better muscle activation and growth.
Additionally, maintaining proper wrist and forearm flexibility is essential for executing the exercise correctly. Adequate flexibility allows for a full range of motion and prevents strain on the joints. Remember to maintain a firm but relaxed grip and avoid excessive bending or extending of the wrists to protect against unnecessary stress.
Elbow Stability and Alignment
To ensure proper form and technique for the EZ Bar Seated Wrist Curl, focus on maintaining elbow stability and alignment throughout the exercise. This is crucial for maximizing the benefits of the exercise and minimizing the risk of injury.
Here are three key points to keep in mind:
- Elbow Stability: Keep your elbows firmly planted on the bench throughout the movement. Avoid any excessive movement or swinging of the elbows, as this can put unnecessary stress on the joints and compromise the effectiveness of the exercise.
- Alignment: Maintain a straight line from your elbows to your wrists. This alignment ensures that the targeted muscles are properly engaged and that the load is distributed evenly.
- Wrist Strength: While the focus is on the wrists, it's important to remember that the strength and stability of the elbows play a significant role in this exercise. Strengthening the forearms and wrists will help improve overall elbow stability and alignment.
By following these guidelines, you can enhance the effectiveness of the EZ Bar Seated Wrist Curl and improve your wrist strength.
Now, let's discuss common mistakes to avoid in order to further optimize your workout.
Common Mistakes to Avoid
To ensure proper form and technique for the EZ Bar Seated Wrist Curl, focus on avoiding these common mistakes.
- First, don't use excessive weight that you can't control. This can lead to poor form and increase the risk of injury.
- Secondly, avoid using momentum to lift the weight. Instead, concentrate on using your wrist muscles to perform the exercise.
- It's important to maintain a neutral wrist position throughout the movement and avoid bending it too far back or forward.
- Lastly, don't rush through the exercise. Take your time and perform each rep with control and precision.
Common Mistakes to Avoid During the Exercise
Avoiding improper form is crucial for maximizing the effectiveness of the EZ Bar Seated Wrist Curl exercise. To ensure you're performing the exercise correctly and avoiding common mistakes, follow these tips:
- Using too much weight: One of the most common mistakes is using too much weight, leading to poor form and potential injury. Start with a lighter weight and gradually increase as your strength improves.
- Incorrect grip: Make sure to grip the EZ bar with your palms facing up and your wrists in a neutral position. Avoid bending your wrists or allowing them to drop downwards during the exercise.
- Not fully extending or flexing the wrists: It's important to fully extend your wrists at the bottom of the movement and flex them as much as possible at the top. Failing to do so reduces the effectiveness of the exercise.
Variations and Progressions for Advanced Lifters
As you progress as an advanced lifter, you can incorporate variations and progressions to further challenge your wrists and increase the intensity of the EZ Bar Seated Wrist Curl exercise. These variations and techniques won't only help you prevent plateaus but also maximize your wrist and forearm strength gains.
One variation you can try is the Reverse EZ Bar Seated Wrist Curl. Instead of curling your wrists upwards, you'll curl them downwards. This targets the muscles in the forearms from a different angle, providing a new stimulus for growth.
Another variation is the Single Arm EZ Bar Seated Wrist Curl. This involves using only one arm at a time, which increases the demand on the working arm and improves your grip strength.
To further challenge yourself, you can increase the weight or the number of sets and reps. You can also try performing the exercise on an incline bench, which increases the range of motion and adds more resistance to the movement.
By incorporating these variations and techniques, you can keep progressing and continue to challenge your wrists and forearms.
Now let's move on to the next section, where you'll find tips for maximizing your wrist and forearm strength gains.
Tips for Maximizing Wrist and Forearm Strength Gains
To maximize your wrist and forearm strength gains, it's crucial to maintain proper wrist alignment throughout your exercises. This means keeping your wrists in a neutral position, not allowing them to bend or twist excessively.
Additionally, using progressive overload techniques, such as gradually increasing the weight or resistance over time, can help challenge your muscles and stimulate growth.
Proper Wrist Alignment
You can maximize your wrist and forearm strength gains by maintaining proper wrist alignment during the EZ Bar Seated Wrist Curl exercise. Proper wrist alignment not only prevents injuries but also ensures that you effectively target your wrist and forearm muscles.
Here are some tips for maintaining proper wrist alignment during this exercise:
- Neutral Wrist Position: Keep your wrist in a neutral position, neither flexed nor extended. This allows for optimal muscle engagement and reduces strain on the wrist joint.
- Hand Placement: Hold the EZ bar with a firm grip, making sure your hands are positioned evenly on the bar. Avoid gripping too tightly, as it can restrict blood flow and reduce muscle activation.
- Controlled Movements: Perform the exercise in a slow and controlled manner, focusing on the contraction and extension of your wrist muscles. Avoid any jerky or abrupt movements that can strain the wrists.
Progressive Overload Techniques
Maximize your wrist and forearm strength gains by implementing progressive overload techniques during the EZ Bar Seated Wrist Curl exercise. To achieve optimal results, it's important to consider training frequency suggestions.
Ideally, you should perform this exercise two to three times a week, allowing for adequate rest and recovery between sessions.
Another effective technique to incorporate is implementing rest-pause sets. After reaching failure with a certain weight, take a 10 to 15-second break, then continue with the exercise using the same weight until failure is reached again. This technique helps to increase intensity and stimulate muscle growth.
By gradually increasing the weight lifted and incorporating rest-pause sets, you can continually challenge your muscles and promote strength gains in your wrists and forearms.
Now, let's move on to the next section where we'll discuss a sample workout that incorporates the EZ Bar Seated Wrist Curl.
Sample Workout Incorporating the EZ Bar Seated Wrist Curl
Incorporate the EZ Bar Seated Wrist Curl into your workout routine for improved wrist strength and flexibility. This exercise specifically targets the muscles in your forearms, helping you to develop a stronger grip and enhanced wrist stability.
Here is a sample workout that incorporates the EZ Bar Seated Wrist Curl:
- Warm-up: Start your workout with 5-10 minutes of light cardio to get your blood flowing and warm up your muscles.
- EZ Bar Seated Wrist Curl: Perform 3 sets of 12-15 reps, using a weight that challenges you but allows you to maintain proper form.
- Superset: Pair the EZ Bar Seated Wrist Curl with a forearm stretch exercise. Perform 3 sets of 10-12 reps of the wrist curl, followed by 3 sets of 30 seconds of forearm stretches.
- Cool-down: Finish your workout with some gentle stretching exercises for your wrists and forearms.
Workout modifications:
- If you find the EZ Bar too challenging, you can start with a lighter weight or use a straight barbell instead.
- Increase or decrease the number of sets and reps based on your fitness level and goals.
Equipment alternatives:
- If you don't have access to an EZ Bar or barbell, you can use dumbbells or resistance bands instead.
Remember to listen to your body and adjust the workout as needed. With consistency and proper form, incorporating the EZ Bar Seated Wrist Curl into your routine can help you develop stronger and more flexible wrists.
Frequently Asked Questions
How Many Sets and Reps Should I Do for the EZ Bar Seated Wrist Curl?
For the EZ bar seated wrist curl, it's important to know how many sets and reps to do.
To properly perform this exercise, start by sitting on a bench with your forearms resting on your thighs and your palms facing up.
With a firm grip on the EZ bar, curl your wrists up as far as possible, then lower them back down.
Aim for 3 sets of 10-15 reps, ensuring you maintain proper form throughout.
Avoid common mistakes like using too much weight or allowing your wrists to bend.
Can the EZ Bar Seated Wrist Curl Help With Wrist Pain or Injuries?
The EZ bar seated wrist curl can help with wrist pain or injuries by strengthening the muscles in your wrists and forearms. Incorporating wrist exercises into your fitness routine can provide several benefits, such as improved grip strength and increased wrist stability.
Wrist pain is often caused by repetitive motions or improper form during exercises. To prevent wrist pain, it's important to use proper technique, warm up before workouts, and gradually increase the intensity of your exercises.
What Is the Recommended Weight to Start With for Beginners?
When starting the EZ Bar Seated Wrist Curl, it's important to begin with a weight that's suitable for beginners. The recommended weight for beginners is usually around 5-10 pounds.
However, it's essential to listen to your body and adjust the weight accordingly. If you find the starting weight too challenging, you can modify the exercise by using a lighter weight or even starting without any weight at all.
Gradually increase the weight as you build strength and confidence.
Are There Any Alternatives to the EZ Bar Seated Wrist Curl Exercise?
There are several alternatives to the EZ bar seated wrist curl exercise that you can try.
One option is the dumbbell wrist curl, where you hold a dumbbell in your hand and curl your wrist up and down.
Another variation is the cable wrist curl, where you use a cable machine and attach a wrist curl attachment to perform the exercise.
These variations can target your wrist muscles in different ways and provide a new challenge to your workout routine.
How Long Does It Typically Take to See Results From Doing the EZ Bar Seated Wrist Curl?
Typically, the time it takes to see results from the EZ bar seated wrist curl exercise can vary. The progression timeline depends on factors like your starting fitness level, consistency, and intensity of your workouts.
Some people may notice improvements in wrist strength and muscle definition within a few weeks, while others may take longer. Remember to focus on proper form and gradually increase the weight to challenge your muscles and promote progress.
Conclusion
In conclusion, the EZ bar seated wrist curl is a great exercise for strengthening the wrists and forearms.
By using proper form and avoiding common mistakes, you can maximize your gains and prevent injuries.
Advanced lifters can also try variations and progressions to challenge themselves further.
Incorporating this exercise into your workout routine can help improve your overall wrist and forearm strength.

Author
Years ago, the spark of my life’s passion ignited in my mind the moment I stepped into the local gym for the first time. The inaugural bead of perspiration, the initial endeavor, the very first surge of endorphins, and a sense of pride that washed over me post-workout marked the beginning of my deep-seated interest in strength sports, fitness, and sports nutrition. This very curiosity blossomed rapidly into a profound fascination, propelling me to earn a Master’s degree in Physical Education from the Academy of Physical Education in Krakow, followed by a Sports Manager diploma from the Jagiellonian University. My journey of growth led me to gain more specialized qualifications, such as being a certified personal trainer with a focus on sports dietetics, a lifeguard, and an instructor for wellness and corrective gymnastics. Theoretical knowledge paired seamlessly with practical experience, reinforcing my belief that the transformation of individuals under my guidance was also a reflection of my personal growth. This belief holds true even today. Each day, I strive to push the boundaries and explore new realms. These realms gently elevate me to greater heights. The unique combination of passion for my field and the continuous quest for growth fuels my drive to break new ground.


