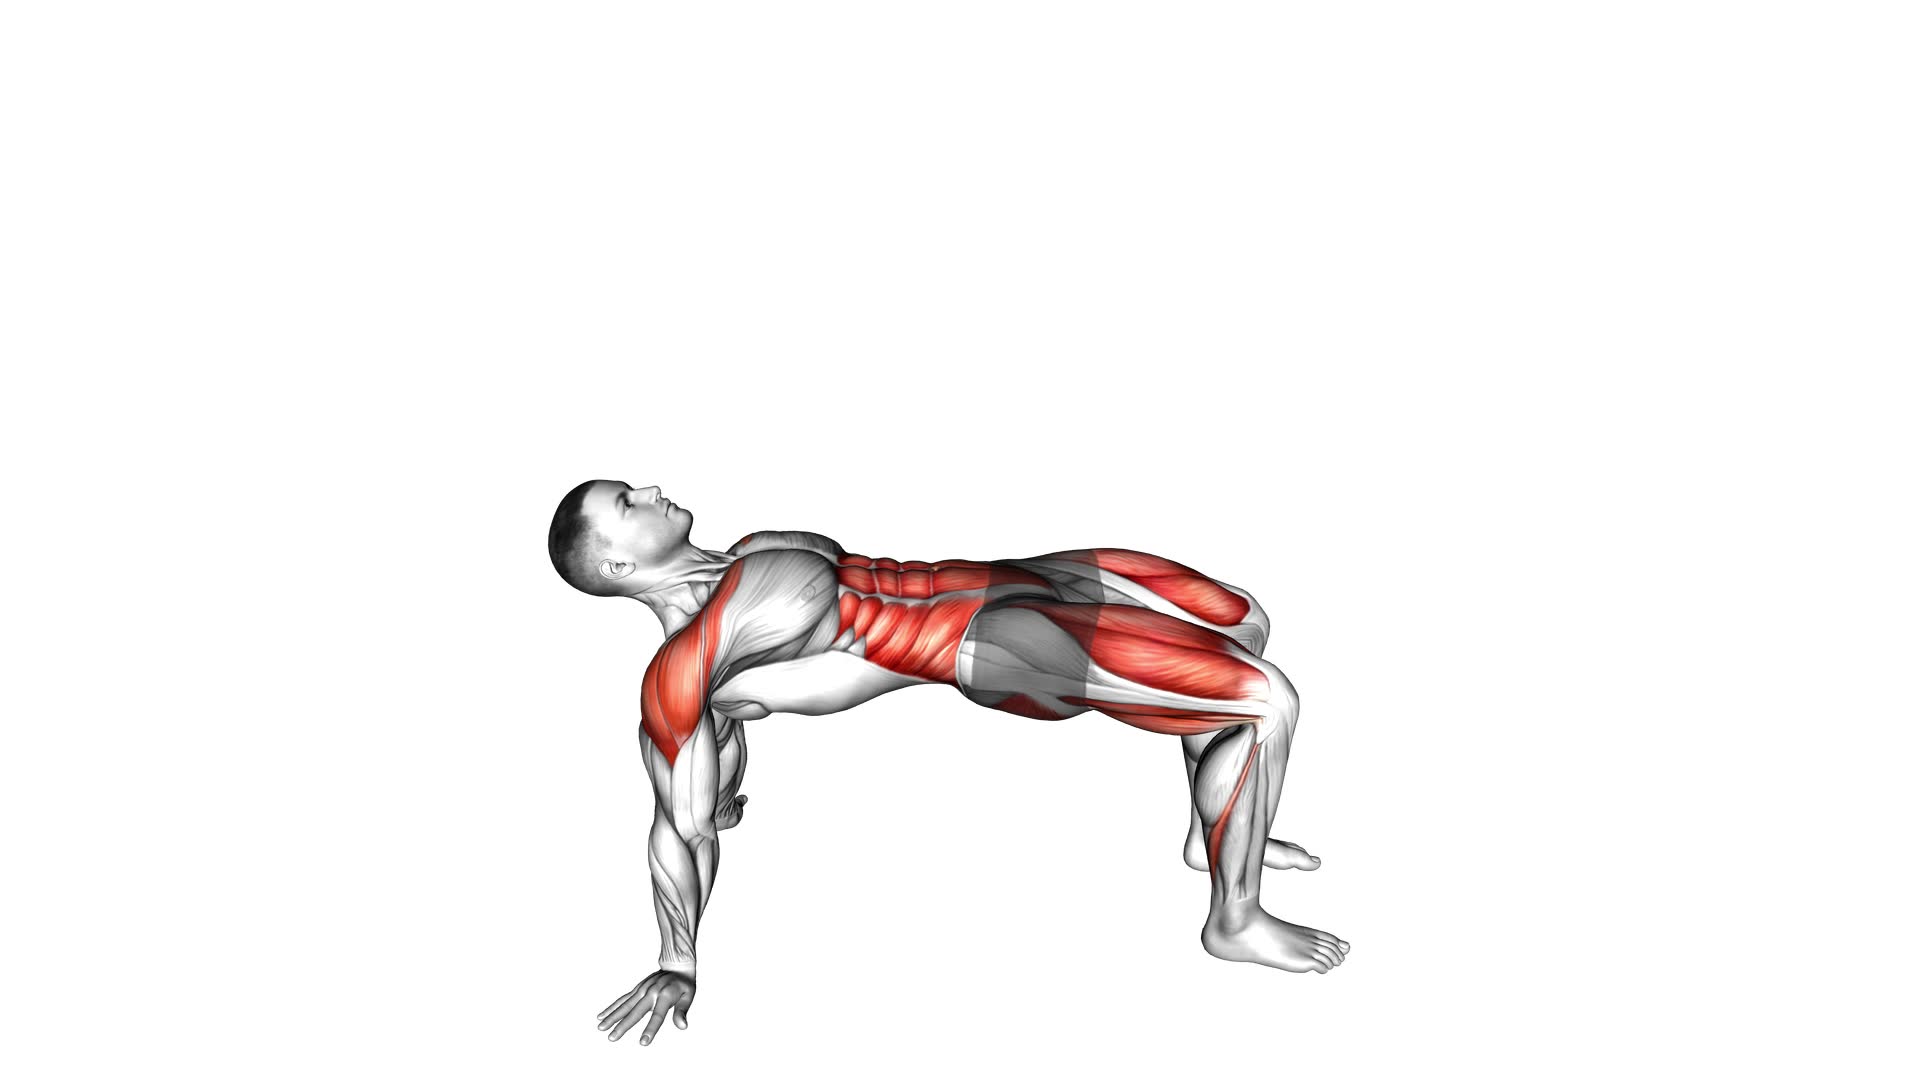
Reverse Plank With Leg Lift – Video Exercise Guide & Tips

Looking to strengthen your core and improve your balance? The Reverse Plank with Leg Lift is the perfect exercise for you. In this video exercise guide, we'll show you the proper form and technique, as well as modifications for all fitness levels.
Watch This Exercise Video
Avoid common mistakes and learn how to enhance stability and balance. Whether you're a beginner or a seasoned fitness enthusiast, this exercise will take your workout routine to the next level.
Let's get started!
Key Takeaways
- The reverse plank with leg lift increases core strength and improves balance.
- This exercise engages the glutes, hamstrings, and shoulders.
- Modifications and variations can be made to adjust the intensity and challenge of the exercise.
- It is important to maintain proper form and technique, avoiding common mistakes such as sagging hips or arching the lower back.
Benefits of the Reverse Plank With Leg Lift
Experience increased core strength and improved balance with the Reverse Plank With Leg Lift exercise. This variation of the reverse plank not only targets your core muscles but also engages your glutes, hamstrings, and shoulders. By lifting one leg off the ground, you add an extra challenge to the exercise, further enhancing its benefits.
One of the key benefits of the Reverse Plank With Leg Lift is its ability to strengthen your core. As you hold the reverse plank position, your abdominal muscles are engaged to maintain stability. By lifting one leg, you increase the demand on your core, forcing it to work harder to keep your body aligned.
Another advantage of this exercise is improved balance. The reverse plank requires you to balance on your hands and heels, activating the muscles in your feet and ankles. When you lift one leg, your balance is challenged even more, as you need to find stability on just three points of contact.
To modify the reverse plank with leg lift, you can start by bending your knees and keeping your feet on the ground. This reduces the intensity while still allowing you to experience the core and balance benefits.
Proper Form and Technique for the Exercise
To perform the Reverse Plank With Leg Lift exercise correctly, follow these proper form and technique guidelines.
First, start by sitting on the floor with your legs extended in front of you and your hands placed on the floor behind you, fingers pointing towards your feet. Lift your hips off the ground, creating a straight line from your head to your heels. Engage your core and glutes to maintain stability throughout the exercise.
One common mistake to avoid is allowing your hips to sag or your lower back to arch. This can put unnecessary strain on your lower back and decrease the effectiveness of the exercise. Instead, focus on keeping your body in a straight line, with your hips lifted and your core engaged.
Another stability tip is to keep your shoulders down and away from your ears. This will help maintain proper posture and prevent any tension or strain in your neck and shoulders.
When performing the leg lift, make sure to keep your leg straight and engage your glutes to lift it off the ground. Avoid swinging your leg or using momentum to lift it higher. Instead, focus on controlled movements and maintain stability throughout.
Modifications and Variations for Different Fitness Levels
Modify the Reverse Plank With Leg Lift exercise based on your fitness level to challenge yourself or make it more accessible. Here are some modifications and variations that you can try:
- If you have injuries or limitations, you can perform the exercise with bent knees instead of straight legs. This will help reduce strain on the lower back and make it more manageable for those with knee issues.
- For advanced athletes looking for an extra challenge, you can add a resistance band around your thighs. This will engage your muscles even more and intensify the workout.
- Another variation for advanced athletes is to incorporate a stability ball. Place your feet on the ball instead of the floor and lift your hips off the ground. This will require more core stability and balance.
Remember to always listen to your body and adjust the exercise accordingly. If you have any injuries or discomfort, consult with a fitness professional or physical therapist for modifications specific to your needs.
Now that you know how to modify and vary the Reverse Plank With Leg Lift exercise, let's move on to the next section where we'll discuss common mistakes to avoid while performing the exercise.
Common Mistakes to Avoid While Performing the Exercise
When performing the reverse plank with leg lift exercise, it's important to maintain proper body alignment to prevent strain or injury.
Engage your core muscles throughout the movement to ensure stability and avoid putting excessive pressure on your lower back.
Additionally, focus on controlled leg movements to maximize the effectiveness of the exercise and minimize the risk of jerky or uncontrolled motions.
Proper Body Alignment
You should always ensure proper body alignment while performing the reverse plank with leg lift exercise to avoid common mistakes. Proper body alignment is crucial for effective and safe execution of the exercise, as well as for preventing injuries.
Here are three important tips to maintain proper body alignment during the reverse plank with leg lift:
- Align your wrists directly under your shoulders to ensure proper weight distribution and stability.
- Keep your body in a straight line from your head to your heels, engaging your core muscles to maintain a neutral spine.
- Avoid sinking or sagging in your hips by actively pressing through your heels and lifting your glutes off the ground.
Engaging Core Muscles
To engage your core muscles effectively during the reverse plank with leg lift exercise, maintain proper body alignment and focus on activating your abdominal muscles. Core stability is crucial for this exercise as it helps to support your spine and maintain balance.
One common mistake is allowing your hips to sag or lift too high, which can reduce the engagement of the core muscles. Keep your body in a straight line from your head to your heels, and imagine pulling your belly button towards your spine to activate your core.
Additionally, avoid using momentum to lift your leg. Instead, focus on using your core muscles to control the movement and lift your leg with control.
Controlled Leg Movement
To maintain control during the reverse plank with leg lift exercise, focus on controlling your leg movements with the activation of your core muscles. By doing so, you can maximize the effectiveness of the exercise and avoid common mistakes.
Here are three important tips to help you achieve controlled leg movements:
- Engage your core: Keep your abdominal muscles tight and your lower back pressed against the ground. This will provide a stable base for your leg movements and prevent excessive arching of the lower back.
- Control the range of motion: Lift your legs slowly and with control. Avoid swinging or jerking your legs, as this can put unnecessary strain on your hips and lower back.
- Focus on balance and stability: Maintain equal weight distribution between your hands and heels. This will help you stay balanced and prevent any wobbling or tipping.
By following these tips, you can ensure controlled leg movements and fully experience the benefits of leg lifts.
Now, let's move on to some tips for improving stability and balance during the exercise.
Tips for Improving Stability and Balance During the Exercise
To improve stability and balance during the reverse plank with leg lift exercise, it's important to focus on proper foot positioning and engaging your core muscles.
Make sure your feet are firmly planted on the ground, with your toes pointing forward.
Engage your core by pulling your belly button towards your spine, which will help stabilize your body and maintain balance throughout the exercise.
Proper Foot Positioning
To improve stability and balance during the Reverse Plank With Leg Lift exercise, focus on positioning your feet correctly. Proper foot alignment is crucial for maintaining a strong and stable base throughout the exercise. Here are some tips to help you achieve the right foot positioning:
- Align your heels with your hips: Place your heels directly under your hip bones to ensure proper alignment and balance.
- Keep your toes pointing forward: Avoid letting your toes turn outward or inward, as this can throw off your stability.
- Press through your heels: Engage your leg muscles and press through your heels to activate the posterior chain and maintain a solid foundation.
Engaging Core Muscles
Engage your core muscles to improve stability and balance during the Reverse Plank With Leg Lift exercise. Core strengthening is crucial for maintaining proper form and maximizing the benefits of this exercise. By activating your core, you create a solid foundation that allows you to lift your leg with control and stability.
To engage your core, focus on pulling your belly button towards your spine while maintaining a neutral spine position. This will activate your deep abdominal muscles and provide the stability needed to perform the exercise effectively.
In addition to core strengthening, core stability is also essential. By keeping your core muscles engaged throughout the exercise, you can prevent any unnecessary movement or swaying of the hips, which can compromise your balance.
Now that you understand the importance of engaging your core, let's move on to how you can incorporate the Reverse Plank With Leg Lift into your workout routine.
How to Incorporate the Reverse Plank With Leg Lift Into Your Workout Routine
To effectively incorporate the reverse plank with leg lift into your workout routine, start by positioning yourself on the ground with your hands and feet flat on the floor. This exercise targets your core, glutes, and shoulders, providing a challenging full-body workout.
Here are three ways to incorporate the reverse plank with leg lift into your routine:
- Reverse Plank Modification: If you're new to this exercise, you can start by bending your knees and keeping your feet flat on the floor. This modification reduces the intensity and allows you to focus on maintaining proper form and engaging your core muscles.
- Single Leg Lift: Once you feel comfortable with the reverse plank, you can progress to lifting one leg at a time. This adds an extra challenge to your core and glutes as you work to stabilize your body while lifting and lowering your leg.
- Alternating Leg Lifts: To further intensify the exercise, try alternating leg lifts. Lift one leg as you raise your hips into the reverse plank position, then lower it as you lower your hips back down. Switch legs and repeat. This variation increases the demand on your core and glutes, providing a more challenging workout.
Incorporating these reverse plank modifications and leg lift variations into your workout routine can help you build strength, improve stability, and enhance your overall fitness level. Remember to start with proper form and gradually increase the difficulty as you progress. Stay consistent and enjoy the benefits of this effective exercise.
Frequently Asked Questions
How Many Repetitions of the Reverse Plank With Leg Lift Should I Do?
To determine how many repetitions of the reverse plank with leg lift you should do, it's important to consider your fitness level and goals.
Reverse plank modifications can make the exercise easier or more challenging. Leg lifts provide additional benefits by targeting the core and glute muscles.
Start with a manageable number of reps and gradually increase as you build strength and endurance. Consulting with a fitness professional can also help tailor a workout plan specifically for you.
Can the Reverse Plank With Leg Lift Help With Lower Back Pain?
The reverse plank with leg lift can be beneficial for lower back pain. By incorporating this exercise into your workout routine, you can strengthen your core, glutes, and back muscles, which can help alleviate pain and improve stability.
For beginners with lower back pain, it's important to modify the exercise. Start by keeping your knees bent and placing your feet flat on the ground. Gradually increase the difficulty as your back gets stronger.
Is It Normal to Feel a Burning Sensation in the Glutes While Performing the Exercise?
Feeling a burning sensation in your glutes during the exercise isn't uncommon. It can be a sign that your muscles are being challenged and worked effectively.
However, if the burning sensation is accompanied by sharp or intense pain, it may indicate improper form or overexertion.
Make sure to warm up properly before attempting the exercise, maintain good posture, and start with a lower number of repetitions.
If the burning sensation persists or worsens, it's advisable to seek advice from a healthcare professional.
Can the Reverse Plank With Leg Lift Help in Improving Posture?
Yes, the reverse plank with leg lift can help improve your posture. By engaging your core muscles, this exercise strengthens your back, shoulders, and glutes, which are all essential for maintaining proper posture.
Incorporating reverse plank variations into your workout routine can also increase overall core strength and stability. The leg lift adds an extra challenge, targeting your glutes and hamstrings.
Are There Any Specific Warm-Up Exercises Recommended Before Attempting the Reverse Plank With Leg Lift?
Before attempting the reverse plank with leg lift, it's important to do specific warm-up exercises. These exercises will help prepare your body for the movement and reduce the risk of injury.
Incorporating the reverse plank with leg lift into your workout routine can have many benefits, such as strengthening your core, improving your balance, and increasing your flexibility. It's a challenging exercise that targets multiple muscle groups, making it a great addition to any fitness regimen.
Conclusion
Incorporating the reverse plank with leg lift into your workout routine can provide numerous benefits. These include improved core strength, stability, and balance. By following proper form and technique, avoiding common mistakes, and making modifications based on your fitness level, you can maximize the effectiveness of this exercise.
Remember to focus on maintaining stability and balance throughout the movement. With consistent practice, you'll be on your way to achieving a stronger and more stable body.

Author
Years ago, the spark of my life’s passion ignited in my mind the moment I stepped into the local gym for the first time. The inaugural bead of perspiration, the initial endeavor, the very first surge of endorphins, and a sense of pride that washed over me post-workout marked the beginning of my deep-seated interest in strength sports, fitness, and sports nutrition. This very curiosity blossomed rapidly into a profound fascination, propelling me to earn a Master’s degree in Physical Education from the Academy of Physical Education in Krakow, followed by a Sports Manager diploma from the Jagiellonian University. My journey of growth led me to gain more specialized qualifications, such as being a certified personal trainer with a focus on sports dietetics, a lifeguard, and an instructor for wellness and corrective gymnastics. Theoretical knowledge paired seamlessly with practical experience, reinforcing my belief that the transformation of individuals under my guidance was also a reflection of my personal growth. This belief holds true even today. Each day, I strive to push the boundaries and explore new realms. These realms gently elevate me to greater heights. The unique combination of passion for my field and the continuous quest for growth fuels my drive to break new ground.


