Side Bridge Hip Abduction – Video Exercise Guide & Tips

Are you looking to strengthen your hip muscles?
Watch This Exercise Video
In this article, we'll guide you through Side Bridge Hip Abduction, a powerful exercise that targets your hips and core.
You'll learn the proper form and technique, as well as modifications and progressions to challenge yourself.
We'll also share common mistakes to avoid and valuable tips to maximize your results.
So, grab your mat and get ready to elevate your hip strength with Side Bridge Hip Abduction.
Let's dive in!
Key Takeaways
- Side Bridge Hip Abduction strengthens and stabilizes core muscles.
- Side Bridge Hip Abduction targets hip abductors to stabilize the pelvis and prevent injuries.
- Side Bridge Hip Abduction improves hip stability and mechanics.
- Side Bridge Hip Abduction increases overall strength and endurance.
Benefits of Side Bridge Hip Abduction
You will experience numerous benefits from incorporating side bridge hip abduction into your workout routine. Side bridge hip abduction is a versatile exercise that offers various variations to target different muscle groups and enhance your full body workout.
One of the key benefits of side bridge hip abduction is its ability to strengthen and stabilize your core muscles. By engaging your obliques, glutes, and deep abdominal muscles, this exercise helps improve your posture and balance. It also targets the muscles on the side of your hips, known as the hip abductors, which play a crucial role in stabilizing your pelvis and preventing injuries.
In addition to core strength, side bridge hip abduction can also increase your overall hip stability. The exercise specifically targets the gluteus medius, a muscle responsible for hip abduction and rotation. Strengthening this muscle can improve your hip mechanics, reducing the risk of hip pain and injury during activities like running, jumping, or lifting.
Furthermore, incorporating side bridge hip abduction into your full body workout routine can help increase your overall strength and endurance. As you progress and try different variations of the exercise, such as adding resistance bands or lifting your top leg, you challenge your muscles in new ways, leading to greater gains in strength and stamina.
Equipment Needed for Side Bridge Hip Abduction
To perform Side Bridge Hip Abduction effectively, you'll need some essential equipment.
Firstly, a mat or comfortable surface to lie on will provide support and cushioning.
Additionally, resistance bands or ankle weights can be used to add resistance and intensity to the exercise.
For beginners, using a stability ball or foam roller can help with balance and stability.
As you progress, advanced tools like glute bands or cable machines can further challenge your hip abduction strength.
Essential Equipment for Abduction
For Side Bridge Hip Abduction, the essential equipment you need is a resistance band. This versatile tool adds resistance to your workout, helping to strengthen and tone your hip muscles. Here are some equipment options, modifications, and progressions to enhance your Side Bridge Hip Abduction routine:
- Equipment options:
- Resistance band: Choose a band with appropriate resistance for your fitness level.
- Yoga block or pillow: Place it under your supporting elbow for added comfort and stability.
- Modifications:
- Beginner modification: Start with a lighter resistance band or no band at all.
- Advanced modification: Use a heavier resistance band or increase the duration of the exercise.
- Progressions:
- Single-leg abduction: Lift one leg while performing the Side Bridge Hip Abduction to increase the challenge.
- Side plank with abduction: Combine the Side Bridge Hip Abduction with a side plank for a more advanced exercise.
These equipment options, modifications, and progressions will help you customize your Side Bridge Hip Abduction workout for optimal results.
Equipment Options for Beginners
When starting out with Side Bridge Hip Abduction, there are several equipment options that can aid beginners in performing the exercise effectively.
One beginner-friendly exercise modification is using a yoga mat or an exercise mat to provide cushioning and support for the body during the movement. This can help reduce discomfort and prevent any unnecessary strain on the joints.
Another option is to use a resistance band, which can be wrapped around the thighs to add an extra challenge and engage the hip muscles even more.
These modifications for different fitness levels ensure that beginners can gradually progress and improve their strength and stability.
As you become more comfortable with the exercise, you can then explore advanced tools for progression, such as stability balls and weighted ankle straps.
Advanced Tools for Progression
As you progress in your Side Bridge Hip Abduction exercise, you can incorporate advanced tools to enhance your workout. Here are some advanced techniques and alternative exercises that you can consider:
- Resistance Bands:
- Attach a resistance band around your thighs to add resistance and challenge your hip muscles even more.
- This will help improve strength and stability in your hips.
- Weighted Vest:
- Wearing a weighted vest during the exercise will increase the intensity and make it more challenging.
- Start with a lighter weight and gradually increase as you get stronger.
These advanced tools can help take your Side Bridge Hip Abduction exercise to the next level, targeting your hip muscles more effectively. Incorporating these tools into your workout routine will help you continue to progress and achieve your fitness goals.
Proper Form and Technique for Side Bridge Hip Abduction
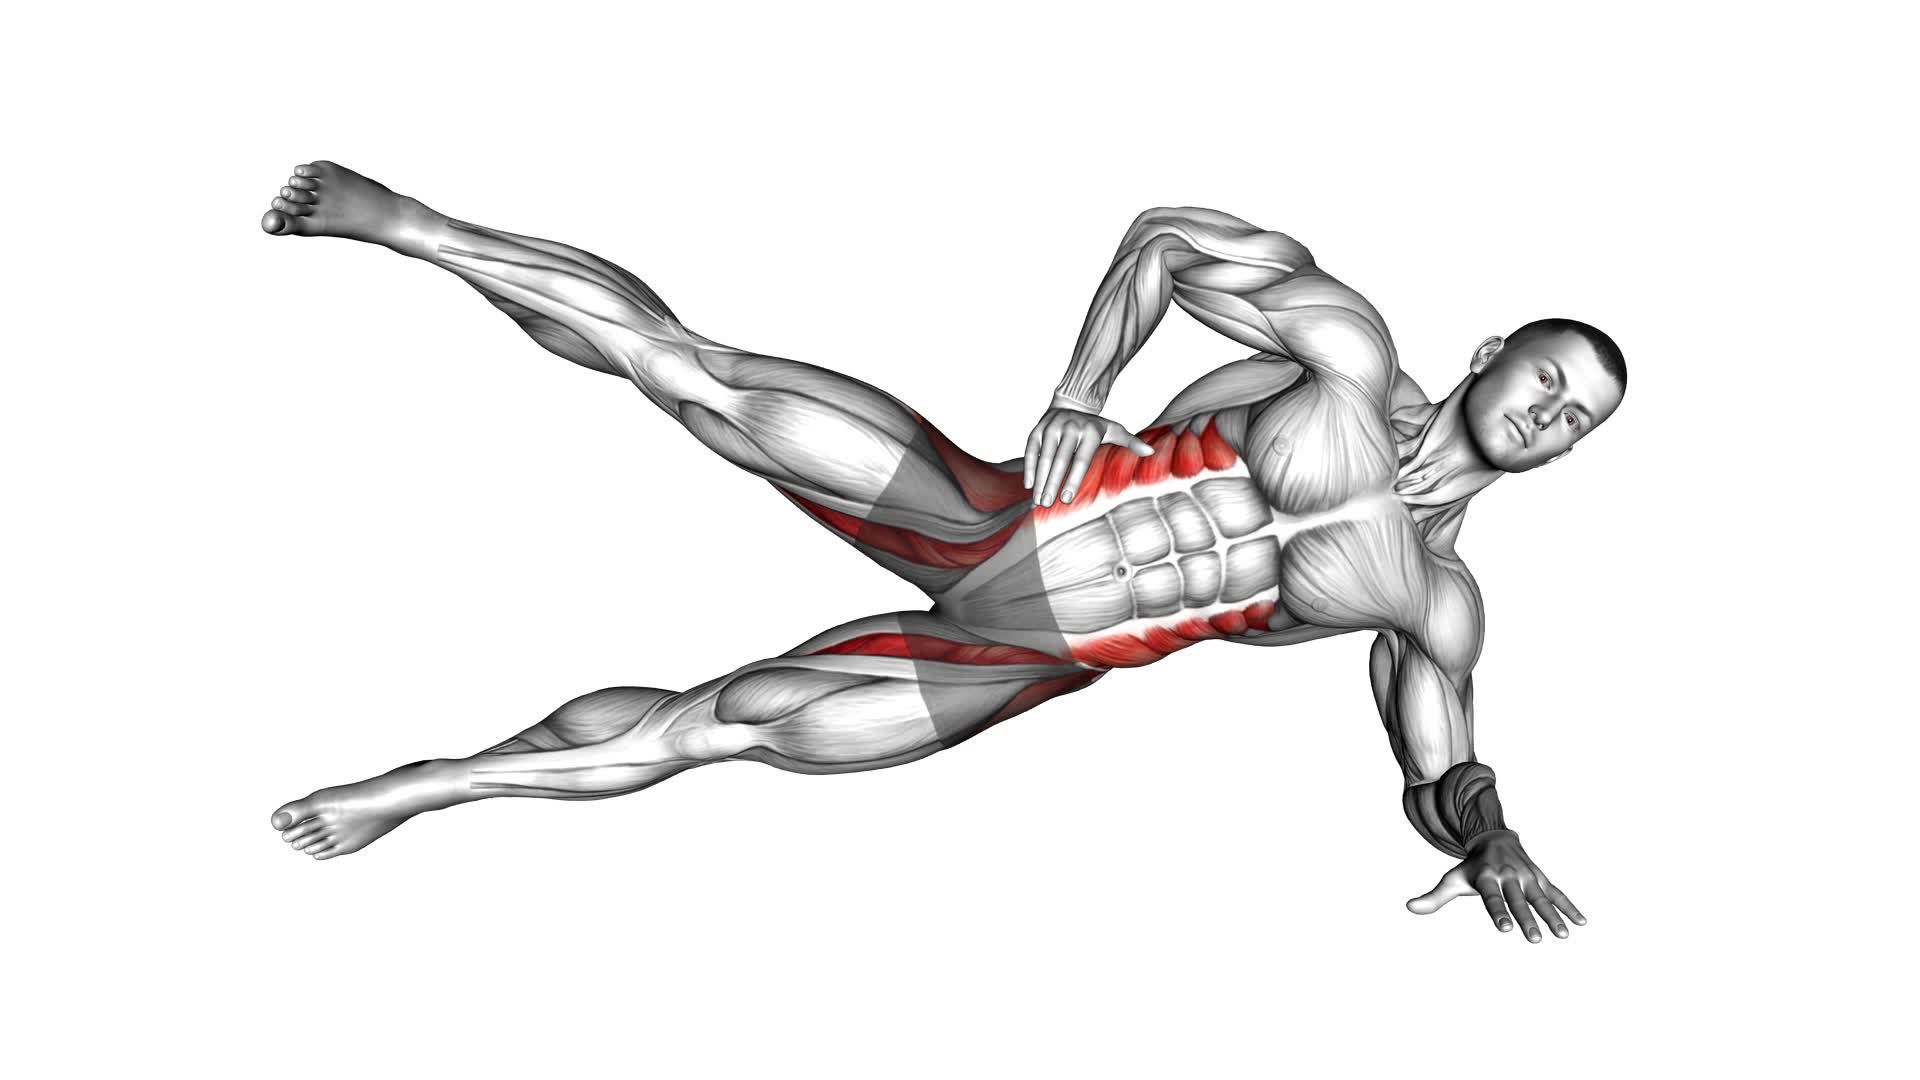
To properly perform side bridge hip abduction, lie on your side with your legs stacked and lift your top leg while maintaining a straight line from your head to your feet. This exercise targets the muscles of your hips, glutes, and core, providing several benefits.
Hip abduction helps improve hip stability and strength, which can enhance your performance in activities such as running, jumping, and squatting. It also helps to prevent injuries by reducing imbalances and improving overall hip function.
For beginners, there are modifications that can be made to make the exercise more accessible. You can start by performing the side bridge without lifting the top leg. This allows you to focus on stabilizing your core and maintaining proper form. As you become more comfortable, gradually add in the hip abduction movement, lifting the top leg up and down in a controlled manner.
To maintain proper form and technique throughout the exercise, remember to keep your body in a straight line from head to toe. Avoid sagging or rotating your hips. Engage your core muscles to stabilize your body and prevent excessive movement.
Start with a few repetitions on each side and gradually increase the number as you build strength and endurance. As always, listen to your body and stop if you experience any pain or discomfort.
Modifications and Progressions for Side Bridge Hip Abduction
Now that you have mastered the proper form and technique for Side Bridge Hip Abduction, it's time to explore some modifications and progressions to further challenge your muscles and enhance your overall strength and stability.
By incorporating these modifications, you can take your Side Bridge Hip Abduction exercise to the next level and continue to see improvements in your core strength and hip stability.
Additionally, we'll discuss common mistakes to avoid to ensure you're getting the most out of this exercise and minimizing the risk of injury.
Proper Form Tips
For optimal results, incorporate these key modifications and progressions into your Side Bridge Hip Abduction routine:
- Proper Form Cues:
- Ensure that your body is in a straight line from head to toe, keeping your hips and shoulders stacked.
- Engage your core muscles by pulling your belly button towards your spine.
- Keep your neck relaxed and in a neutral position.
- Maintain a steady breathing pattern throughout the exercise.
- Common Technique Errors:
- Avoid sagging or sinking hips by engaging your glutes and core muscles.
- Don't lift your top leg too high, as it may lead to instability and compromise form.
- Avoid excessive rotation of the hips or shoulders.
- Don't rush through the exercise; focus on controlled movements.
Advanced Variations Explained
Incorporate advanced variations to further challenge your Side Bridge Hip Abduction routine and continue progressing towards your fitness goals.
These advanced variations will help target your core, glutes, and hips even more effectively.
One advanced variation is the Side Plank with Hip Abduction. Start in a side plank position, then lift the top leg up towards the ceiling, focusing on engaging the glutes and maintaining a stable core.
Another variation is the Side Plank with Knee Tuck. Begin in a side plank position, then bring the top knee towards your chest, engaging the obliques and hip flexors.
These advanced variations require increased stability and strength, so it's important to maintain proper form throughout the movements. Keep your core engaged, hips lifted, and avoid any excessive movement or sagging in the hips.
Give these variations a try to take your Side Bridge Hip Abduction routine to the next level.
Common Mistakes to Avoid
To avoid common mistakes and make effective modifications and progressions for Side Bridge Hip Abduction, focus on maintaining proper form and engaging the targeted muscles.
Here are some tips for improvement:
- Avoid sagging or rotating your hips. Keep your body in a straight line from head to toe.
- Don't rush through the exercise. Slow and controlled movements are key to engaging the muscles properly.
- Engage your core muscles throughout the exercise to ensure stability and prevent excessive strain on your lower back.
- Gradually increase the difficulty of the exercise by using a resistance band or adding ankle weights.
- If you're experiencing any discomfort or pain, stop the exercise and consult with a fitness professional.
By following these tips, you can avoid common mistakes and maximize the benefits of Side Bridge Hip Abduction.
In the next section, we'll discuss specific common mistakes to avoid during this exercise.
Common Mistakes to Avoid During Side Bridge Hip Abduction
Avoid these common mistakes when performing side bridge hip abduction to maximize the effectiveness of your exercise. Proper form is crucial to ensure that you're targeting the correct muscles and avoiding any potential injuries.
One common mistake is allowing your hips to sag or rotate during the exercise. This not only reduces the effectiveness of the movement but also puts unnecessary strain on your lower back. To avoid this, engage your core muscles and maintain a straight line from your head to your heels throughout the entire exercise.
Another mistake to avoid is lifting your top leg too high or too quickly. While it may feel like you're getting a better workout by doing so, it actually shifts the focus away from your hip muscles and places more stress on your lower back. Instead, focus on controlled and precise movements, lifting your leg to a comfortable height while keeping your hips stable.
Lastly, don't forget to breathe properly during the exercise. Holding your breath can lead to increased tension and decreased performance. Remember to inhale through your nose during the easier part of the movement and exhale through your mouth during the more challenging part.
Tips for Getting the Most Out of Side Bridge Hip Abduction
Maximize the effectiveness of your side bridge hip abduction exercise by implementing these tips.
- Focus on proper form: To get the most out of your side bridge hip abduction, it's crucial to maintain proper form throughout the exercise. Keep your body in a straight line from head to toe, engage your core, and avoid sagging or dropping your hips.
- Ensure your shoulder is directly above your elbow and your forearm is perpendicular to the ground.
- Keep your top leg straight and lift it to hip level, engaging the muscles on the side of your hip.
- Utilize modification options: If you find the side bridge hip abduction too challenging, don't worry. There are modification options available to help you build strength gradually. You can start by performing the exercise with bent knees or by resting your bottom knee on the ground for support. As you progress, gradually increase the difficulty by extending your bottom leg or adding resistance bands.
- Use a stability ball to provide additional support and stability during the exercise.
- Incorporate muscle activation techniques: To ensure maximum muscle activation, focus on squeezing the muscles of your glutes and outer thighs during the abduction movement. This will help you target these specific muscles and enhance the effectiveness of the exercise. Additionally, maintain control throughout the movement and avoid any swinging or jerking motions.
Frequently Asked Questions
How Many Sets and Reps Should I Do for Side Bridge Hip Abduction?
To maximize the benefits of the side bridge hip abduction exercise, it's important to consider the number of sets and reps you should do. By gradually increasing the reps, you can challenge your muscles and see progress over time.
Aim for 2-3 sets of 10-12 reps per side, with a rest time of 30-60 seconds in between sets.
As you get stronger, you can explore variations and progressions to continue challenging yourself.
Can Side Bridge Hip Abduction Help With Reducing Lower Back Pain?
Side bridge hip abduction is an effective exercise for reducing lower back pain. By incorporating it into your workout routine, you can experience the benefits of strengthening your core and hip muscles.
To perform this exercise properly for maximum effectiveness, start by lying on your side with your forearm on the ground. Then, lift your hips off the floor while keeping your body in a straight line. Engage your core and slowly raise your top leg as high as you can without rotating your hips.
Is It Normal to Feel a Burning Sensation in the Hip Muscles During Side Bridge Hip Abduction?
Feeling a burning sensation in your hip muscles during side bridge hip abduction isn't uncommon.
It's important to note that proper form is crucial in this exercise. Failing to maintain proper alignment and engaging the correct muscles can lead to discomfort and potential injury.
Common mistakes to avoid include allowing your hips to sag or not fully engaging your glutes.
Be mindful of your form and listen to your body to prevent any unnecessary discomfort.
Are There Any Alternative Exercises That Target the Same Muscles as Side Bridge Hip Abduction?
If you're looking for alternative exercises that target the same muscles as the side bridge hip abduction, you're in luck! There are several options you can try.
These exercises focus on muscle activation in the hips and can help strengthen and tone those areas. Incorporating exercises like clamshells, lateral band walks, and standing hip abduction can provide a great alternative workout and challenge your muscles in different ways.
Give them a try and see which ones work best for you!
Can Side Bridge Hip Abduction Improve Balance and Stability?
Improving your balance and stability is crucial for athletes. Side bridge hip abduction can help you achieve just that. By engaging your core and targeting the hip muscles, this exercise challenges your stability and strengthens the muscles needed for balance.
To progress the difficulty, you can increase the duration or add resistance. Incorporating side bridge hip abduction into your routine can have significant benefits for your athletic performance and overall stability.
Conclusion
Incorporating side bridge hip abduction into your workout routine can greatly benefit your hip strength and stability. By using proper form and technique, and gradually progressing your exercises, you can maximize the effectiveness of this exercise.
Avoiding common mistakes and following the provided tips will help you get the most out of your side bridge hip abduction workouts.
So grab your equipment and start working towards stronger and more stable hips today!

Author
Years ago, the spark of my life’s passion ignited in my mind the moment I stepped into the local gym for the first time. The inaugural bead of perspiration, the initial endeavor, the very first surge of endorphins, and a sense of pride that washed over me post-workout marked the beginning of my deep-seated interest in strength sports, fitness, and sports nutrition. This very curiosity blossomed rapidly into a profound fascination, propelling me to earn a Master’s degree in Physical Education from the Academy of Physical Education in Krakow, followed by a Sports Manager diploma from the Jagiellonian University. My journey of growth led me to gain more specialized qualifications, such as being a certified personal trainer with a focus on sports dietetics, a lifeguard, and an instructor for wellness and corrective gymnastics. Theoretical knowledge paired seamlessly with practical experience, reinforcing my belief that the transformation of individuals under my guidance was also a reflection of my personal growth. This belief holds true even today. Each day, I strive to push the boundaries and explore new realms. These realms gently elevate me to greater heights. The unique combination of passion for my field and the continuous quest for growth fuels my drive to break new ground.


