Low Lunge Yoga Pose Anjaneyasana I (female) – Video Exercise Guide & Tips
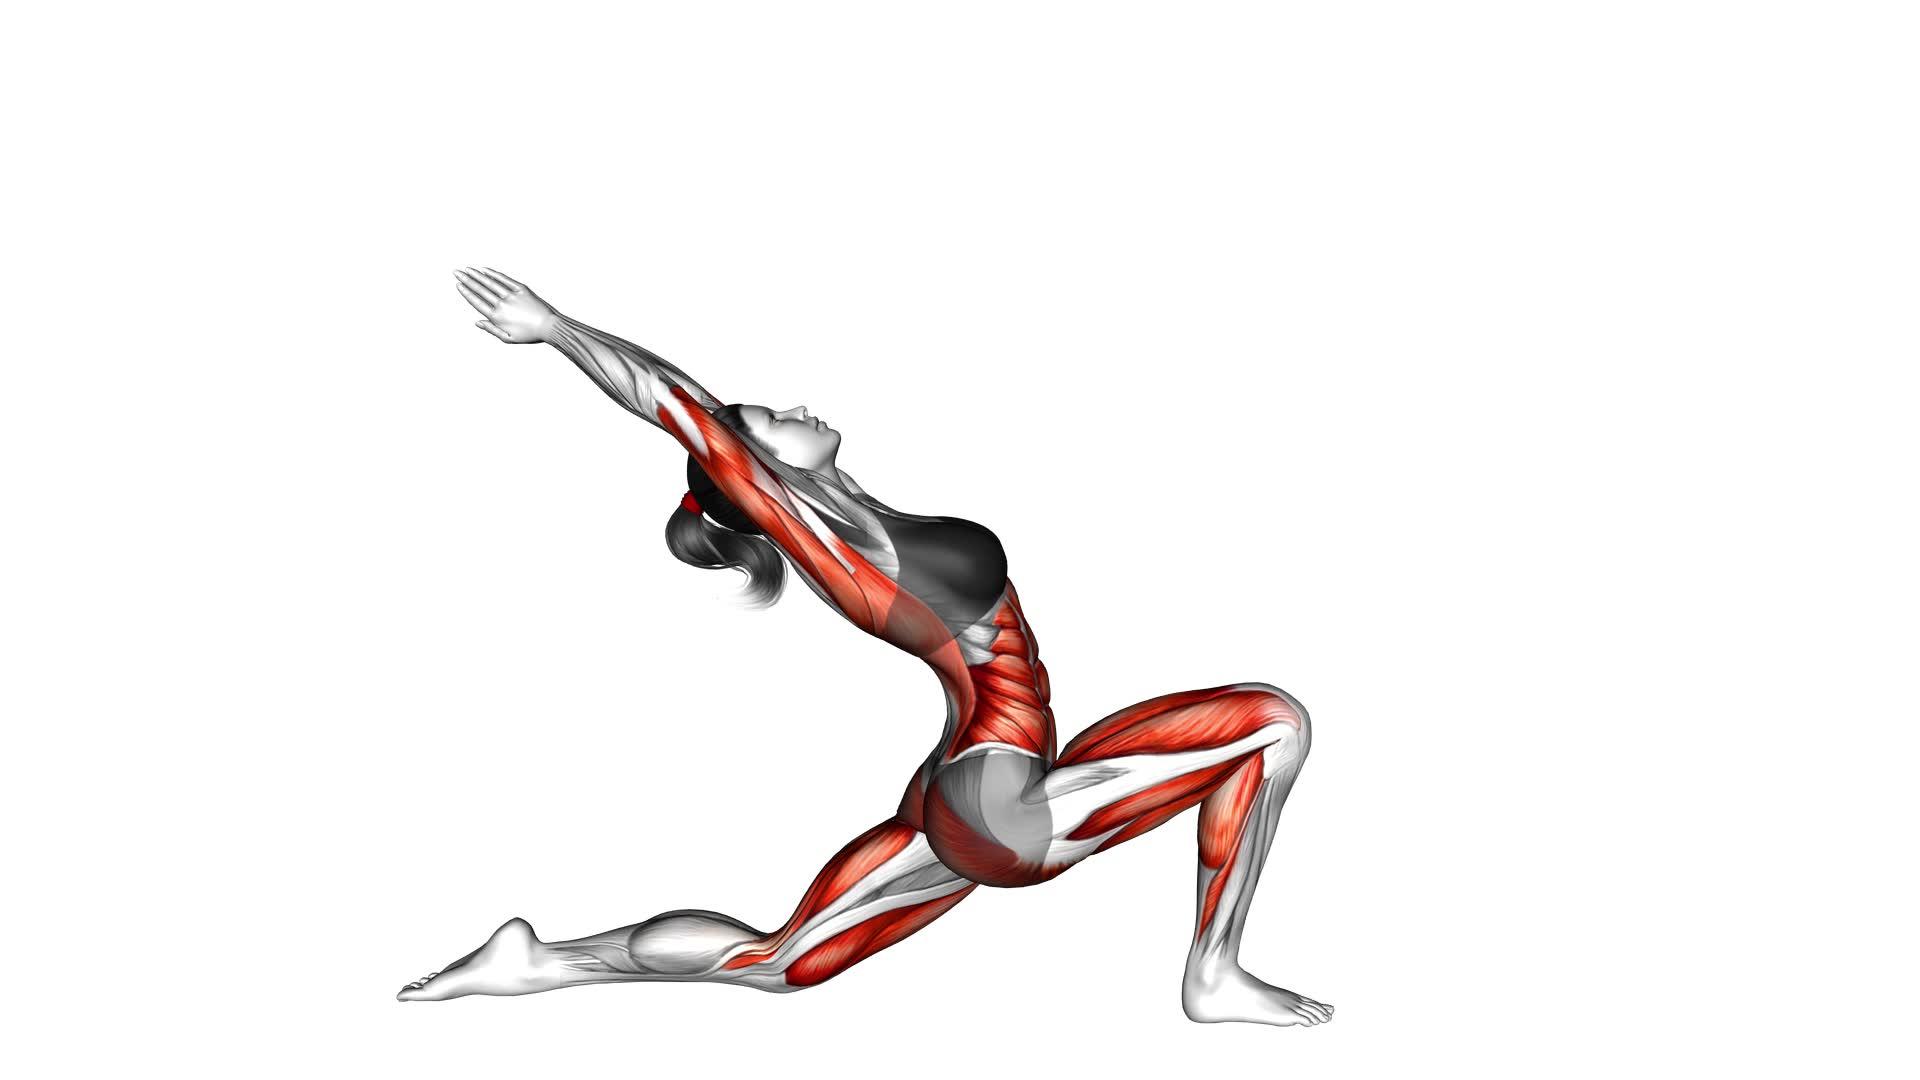
Get ready to strengthen your lower body and open up your hip flexors with the Low Lunge Yoga Pose, also known as Anjaneyasana I.
Watch This Exercise Video
In this video exercise guide, you'll find step-by-step instructions, modifications for all levels, and tips for proper alignment and engagement.
Avoid common mistakes and learn how to incorporate this pose into your yoga flow.
Whether you're a beginner or an experienced yogi, this pose will help you enhance your practice and improve your flexibility.
Let's get started!
Key Takeaways
- Low Lunge Yoga Pose (Anjaneyasana I) stretches the hip flexors and opens up the front of the hips.
- It increases flexibility in the hips and improves range of motion.
- The pose strengthens the legs, including the quadriceps, hamstrings, and glutes.
- It improves balance, stability, and coordination, while also providing relief from lower back pain.
Benefits of Low Lunge Yoga Pose
You can experience numerous benefits by practicing the Low Lunge Yoga Pose. This yoga pose offers a wide range of benefits, particularly in terms of hip opening. When you perform the Low Lunge, you stretch the hip flexors and open up the front of your hips. This can be especially beneficial for individuals who spend long hours sitting or have tight hip muscles. By regularly practicing this pose, you can increase flexibility in your hips and improve your overall range of motion.
In addition to hip opening, the Low Lunge also helps to strengthen your legs and improve balance. As you lunge forward, you engage your quadriceps, hamstrings, and glutes. This not only helps to tone and strengthen these muscles but also improves stability and coordination.
Furthermore, the Low Lunge Yoga Pose can also provide relief from lower back pain. The stretch and opening of the hips can help to alleviate tension in the lower back, making it a great pose for individuals with tightness or discomfort in this area.
Step-by-Step Instructions for Anjaneyasana I
To begin practicing Anjaneyasana I, transition from the Low Lunge Yoga Pose by following these step-by-step instructions:
- From the Low Lunge Yoga Pose, bring your hands to the mat on either side of your front foot.
- Shift your weight back onto your back knee and untuck your toes.
- Slowly lift your torso up, bringing your hands to your front thigh for support.
- Engage your core and lift your chest, lengthening your spine.
Beginner Friendly Modifications:
- If you have difficulty balancing, place a block or folded blanket under your hands for added support.
- If your back knee feels uncomfortable, place a folded blanket or towel underneath it for cushioning.
- If you have tight hip flexors, place your hands on blocks or bring them to your heart center to lessen the intensity.
Proper Alignment Tips:
- Make sure your front knee is directly above your ankle, not extending beyond it.
- Keep your back leg straight and engaged, pressing the top of your foot firmly into the mat.
- Draw your tailbone down towards the mat to avoid overarching your lower back.
- Lengthen through the crown of your head, keeping your neck in line with your spine.
Modifications and Variations for All Levels
Now, let's explore some modifications and variations for all levels of practitioners in the low lunge yoga pose, Anjaneyasana I.
If you're a beginner, there are beginner-friendly modifications that can help you ease into the pose and gradually build strength and flexibility.
On the other hand, if you're more advanced, there are variations that can challenge you and take the pose to a deeper level.
Whether you're just starting out or have been practicing for years, there are options available to suit your level and needs.
Beginner-Friendly Modifications
As a beginner, it's important to explore modifications and variations of the Low Lunge Yoga Pose, Anjaneyasana I (female), in order to adapt the exercise to your current level of flexibility and strength.
Here are some beginner-friendly modifications and alternative poses to consider:
- High Lunge: If you find it difficult to lower your back knee to the ground, you can keep it lifted, creating a high lunge. This modification helps to build strength in your legs and core.
- Block support: Placing a yoga block under your hands can provide extra stability and support, especially if you have tight hamstrings or limited flexibility.
- Knee support: If you experience discomfort in your knee, you can fold a blanket or use a cushion to support it, reducing the pressure on the joint.
- Half Kneeling Pose: Instead of fully extending your back leg, you can keep it bent and rest your knee on the ground, transitioning into a half kneeling pose. This variation is gentler on the hips and knees.
Remember to listen to your body and make adjustments as needed. These modifications will help you ease into the Low Lunge Yoga Pose and gradually build your strength and flexibility.
Advanced Level Variations
Explore advanced level variations and modifications of the Low Lunge Yoga Pose, Anjaneyasana I (female), to deepen your practice and challenge your strength and flexibility.
Advanced modifications of this pose can help you take your yoga practice to the next level. To intensify the stretch in the hip flexors, you can lift the back knee off the mat and bring the hands to the heart center.
Another advanced variation is to extend the arms overhead and interlace the fingers, stretching the chest and shoulders. To challenge your balance and core strength, try lifting the back foot off the ground and reaching the opposite arm forward.
Remember to engage your core and maintain proper alignment throughout these advanced level cues.
Now, let's move on to the next section to learn about common mistakes to avoid in the low lunge pose.
Common Mistakes to Avoid in Low Lunge
One common mistake to avoid in low lunge is allowing your front knee to extend past your ankle. This misalignment can put excessive strain on the knee joint and lead to discomfort or injury. To ensure proper alignment and avoid this mistake, here are some tips to keep in mind:
- Check your knee position: When in low lunge, make sure your front knee is directly above your ankle. This alignment helps to distribute the weight evenly and prevents unnecessary stress on the knee.
- Engage your core: By engaging your core muscles, you can stabilize your body and maintain a balanced posture. This will help you maintain proper alignment in the low lunge pose.
- Lengthen your spine: Keep your spine long and straight, avoiding any rounding or sinking in the lower back. This will help you maintain a stable and aligned position throughout the pose.
- Avoid leaning forward: It's important to avoid leaning too far forward in the low lunge pose. Instead, focus on keeping your torso upright and aligned with your hips.
By following these alignment tips, you can avoid common mistakes and ensure a safe and effective low lunge practice.
Now, let's move on to the next section for more tips on proper alignment and engagement in this pose.
Tips for Proper Alignment and Engagement
To achieve proper alignment and engagement in the low lunge pose, focus on these key tips.
First, make sure your front knee is directly above your ankle, creating a 90-degree angle. This alignment helps to protect your knee and ensures proper engagement of the quadriceps and glutes.
Keep your back leg straight and active, pressing the heel towards the floor. This engages the hamstrings and calf muscles, providing stability to the pose.
Next, maintain a neutral spine by lengthening through the crown of your head and drawing your tailbone down towards the mat. This alignment helps to engage the core muscles and prevents strain on the lower back.
Additionally, keep your shoulders relaxed and away from your ears. This allows for better engagement of the upper body, specifically the chest and shoulders.
To enhance muscle engagement, focus on activating the muscles of the inner thighs by gently drawing them towards each other. This action helps to stabilize the hips and supports proper alignment in the pose.
How to Incorporate Low Lunge Into Your Yoga Flow
Incorporate low lunge into your yoga flow by transitioning smoothly from downward dog. This powerful pose can be seamlessly integrated into your practice, allowing you to experience its numerous benefits. Here are some creative ways to transition into low lunge and ways to deepen your stretch:
- From downward dog, step your right foot forward between your hands. Lower your left knee to the ground, placing the top of your foot flat on the mat. Bring your hands to your right thigh, maintaining a strong and upright posture.
- If you prefer a more dynamic transition, try the 'runner's lunge variation.' From downward dog, lift your right leg up and step it forward, keeping your left leg extended behind you. As you reach your right leg forward, bend your right knee and lower your left knee to the mat.
- To deepen your low lunge stretch, focus on sinking your hips down towards the mat. Engage your core muscles and gently press your pelvis forward, feeling a stretch in the front of your left hip and thigh.
- Another way to deepen the stretch is by raising your arms overhead, lengthening through your spine, and opening your chest. Lift your gaze towards the ceiling, taking deep breaths to enhance the stretch and release any tension.
Frequently Asked Questions
Is the Low Lunge Yoga Pose Suitable for Beginners?
Yes, the low lunge yoga pose can be suitable for beginners.
It's a great way to stretch and strengthen your legs, hips, and core.
To make it more accessible, you can modify the pose by using blocks or keeping your back knee on the ground.
Another variation for beginners is to shorten the stance, bringing your front foot closer to your back knee.
Remember to listen to your body and go at your own pace.
Can the Low Lunge Yoga Pose Help With Flexibility?
The low lunge yoga pose can definitely help improve your flexibility. By stretching your hip flexors and quadriceps, this pose targets those tight areas and gradually increases your range of motion.
You can also try different variations and modifications for the low lunge to make it more accessible or challenging depending on your skill level.
Incorporating this pose into your regular yoga practice will aid in loosening up your muscles and enhancing your overall flexibility.
How Does the Low Lunge Yoga Pose Benefit the Hips and Thighs?
The low lunge yoga pose offers numerous benefits for your hips and thighs. By stretching and strengthening these areas, it can improve flexibility and range of motion. This pose targets the hip flexors, quadriceps, and glutes, helping to release tension and tightness. It also engages the core and improves balance.
There are variations of the low lunge pose that can further target specific areas, such as the high lunge or crescent lunge. Incorporating this pose into your yoga practice can bring about positive changes in your hip and thigh muscles.
Can the Low Lunge Yoga Pose Help Improve Balance?
Improving stability is one of the benefits of the low lunge yoga pose. By practicing this pose, you can enhance your balance and core strength.
There are variations and modifications available to suit your needs and level of experience. These adaptations can help you progress in your practice and challenge yourself.
Are There Any Precautions or Contraindications for Practicing the Low Lunge Yoga Pose?
When practicing the low lunge yoga pose, it's important to be aware of any precautions or contraindications that may apply to you.
Some individuals with knee or ankle injuries may need to modify the pose or avoid it altogether.
Additionally, if you have high blood pressure or are in the later stages of pregnancy, it's recommended to consult with a qualified yoga instructor before attempting this pose.
Always listen to your body and make modifications as needed to ensure a safe practice.
Conclusion
In conclusion, practicing the low lunge yoga pose, also known as Anjaneyasana I, offers numerous benefits for both the mind and body.
By following the step-by-step instructions and incorporating modifications and variations, individuals of all levels can experience the advantages of this pose.
It's important to avoid common mistakes and focus on proper alignment and engagement to maximize the benefits.
Incorporating the low lunge into your yoga flow can enhance your practice and bring a sense of balance and strength.

Author
Years ago, the spark of my life’s passion ignited in my mind the moment I stepped into the local gym for the first time. The inaugural bead of perspiration, the initial endeavor, the very first surge of endorphins, and a sense of pride that washed over me post-workout marked the beginning of my deep-seated interest in strength sports, fitness, and sports nutrition. This very curiosity blossomed rapidly into a profound fascination, propelling me to earn a Master’s degree in Physical Education from the Academy of Physical Education in Krakow, followed by a Sports Manager diploma from the Jagiellonian University. My journey of growth led me to gain more specialized qualifications, such as being a certified personal trainer with a focus on sports dietetics, a lifeguard, and an instructor for wellness and corrective gymnastics. Theoretical knowledge paired seamlessly with practical experience, reinforcing my belief that the transformation of individuals under my guidance was also a reflection of my personal growth. This belief holds true even today. Each day, I strive to push the boundaries and explore new realms. These realms gently elevate me to greater heights. The unique combination of passion for my field and the continuous quest for growth fuels my drive to break new ground.

